Understanding Signal Chain
The signal chain is the path your sound takes from the source, like a guitar, voice, or microphone, to the final recording. Every connection from the mic to cable to mixer to computer changes how it sounds. Understanding the signal chain helps you shape your sound and fix problems quickly, making sure your recordings are clear and high quality.

Here is another, slightly more complex signal chain:

Noise Floor and Clipping Threshold
Each piece of music production equipment has an input and an output, often called I/O. Input levels show the signal going into the equipment, while output levels show the signal being sent out. Understanding these levels is important because they affect how clear, noisy, or distorted your sound will be.

Noise Floor
In music production, the noise floor is the point at which a signal becomes so weak that it cannot overcome the natural self-noise of the equipment. When a signal gets close to the noise floor, the signal-to-noise ratio (SNR) drops, and amplifying it can make unwanted hiss or hum more noticeable. While some noise can be reduced with software or AI tools, it’s always better to prevent noise during recording rather than trying to fix it afterward.
Clipping Point
At the opposite end of the spectrum is the clipping point. A signal clips when it is too loud for the system, producing a flat waveform with the top “cut off.” This distortion is usually undesirable and difficult to fix later. Although some AI tools can reduce clipping, they may also introduce unintended changes to tone or sound quality. The best approach is to prevent clipping by setting the gain appropriately.
Setting Proper Gain
Building off of the concepts we just established, we will now apply them to every point in our signal chain. Gain staging is the process of managing audio signal levels at each stage in a signal chain to ensure each component works within its optimal dynamic range. A desired gain level lives in the sweet spot between the noise floor and the clipping threshold. Understanding how to efficiently set gain levels at each point in the chain ensures that you have a signal with clarity, minimal noise, no distortion, and enough headroom to mix and master your track appropriately.
Here is a graphic to illustrate how gain should be set with different input levels. Notice how the sweet spot is the largest with an appropriate gain level from the input:

Key Concepts & Definitions
Before exploring microphone types and placement techniques, it's essential to understand a few fundamental terms used to describe microphone behavior and sound capture quality. These concepts form the basis for comparing different microphones and deciding how to use them in context.
Polar Pattern
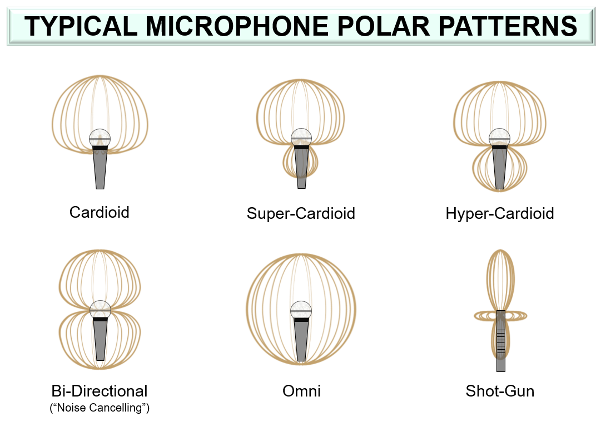
A polar pattern shows how a microphone picks up sound from different directions. It helps control what the mic hears and what it rejects:
Cardioid: Sensitive to sound from the front, rejects the rear. Great for isolating sources in noisy spaces.
Supercardioid / Hypercardioid: Narrower front sensitivity than cardioid, with a small rear lobe. More directional, requires careful placement.
Omnidirectional: Picks up sound equally from all directions. Natural, open sound; best in good acoustic spaces.
Figure-8 (Bidirectional): Captures sound from front and back, rejects sides. Common for ribbon mics and stereo recording techniques.
Understanding polar patterns helps manage bleed, feedback, and room tone in recordings.
Transient Response
Transient Response refers to how quickly a microphone reacts to sudden, high-amplitude sounds (transients), such as a snare hit or a plucked string.
Fast transient response (common in condenser mics) captures the fine detail of sharp attacks with clarity and accuracy.
Slower transient response (typical of dynamic mics) can round off those sharp peaks, often adding a subtle softening or sustain effect. This can be musically desirable in certain contexts, like taming harsh guitar amps or aggressive vocals.
MICROPHONE TRANSIENT RESPONSES

Frequency Response
A frequency response graph shows how a microphone captures low, mid, and high sounds. It’s usually plotted in Hz (horizontal) vs dB (vertical).
Flat response: Captures sound accurately and naturally, good for measurement or realistic recordings.
Colored response: Boosts or cuts certain frequencies, which can shape the sound (like adding brightness to vocals).
When choosing a mic, think about how its frequency response matches the instrument or voice you’re recording.
Sensitivity
Sensitivity shows how well a mic converts sound into an electrical signal.
High sensitivity (condenser mics): Picks up quiet details easily but may capture more background noise.
Low sensitivity (dynamic mics): Needs more gain but handles loud environments better.
Microphone Types & Placement
In music production, three main types of microphones are commonly used:
Dynamic: Durable, handles loud sounds like drums and amps, with a slightly compressed/sustained sound.
Condenser: Sensitive and detailed, ideal for vocals, acoustic instruments, and room miking; requires phantom power.
Ribbon: Smooth, warm, vintage tone; fragile and usually figure-8 pattern; great for strings, amps, and overheads.
Placement Tips:
Distance: Close = direct sound; Far = room acoustics; Mid = balance of presence and ambiance.
Angle & Axis: On-axis = bright; Off-axis = softer, less harsh. Experiment with small adjustments for tone.
Room: The space affects your recording—choose good locations or treat the room for better sound.
Bleed: Minimize unwanted sounds by using directional mics, isolating instruments, close-miking, and checking phase alignment.
Bleed Management
Bleed happens when a microphone picks up sounds from sources other than what it’s aimed at (for example, a vocal mic picking up drums). Some bleed is normal, especially in live ensemble recordings, but the goal is to minimize unwanted sounds while keeping what’s musically useful.
The best way to reduce bleed is to record in separate rooms. Our studio has an isolation booth for this purpose. If the booth isn’t available or you want to record everyone in one room, bleed becomes more of a factor, but it can still be controlled with careful mic placement, performer setup, and tracking strategies.
Practical Tips for Controlling Bleed
Use Polar Patterns:
Cardioid mics reject sound from the rear; point the rear at loud sources.
Supercardioid/hypercardioid mics have tighter rejection but need precise placement.
Figure-8 mics (like ribbons) can use side rejection zones creatively.
Mic Placement & Angling:
Close-miking reduces room sound and off-axis bleed.
Angle mics away from loud sources.
Position vocalists and amps back-to-back to take advantage of rejection zones.
Track with Direct Input (DI) When Possible:
Bass, synths, and electric guitars can be recorded via DI to eliminate bleed.
Reamp later if amp tone is needed.
DIY Acoustic Separation:
Use mattresses, rugs, pillows, or heavy blankets to absorb sound between instruments.
Bookshelves, chairs, or closets can act as natural barriers.
Build simple panels or hang moving blankets on stands.
Room Positioning & Performer Staging:
Spread louder and quieter instruments apart.
Make sure loud sources aren’t directly facing any mic.
Use curtains, couches, or non-parallel walls to diffuse reflections.
Multitrack Overdubbing:
Record rhythm section first (drums, bass).
Overdub guitars, vocals, and other instruments individually.
Use a scratch track with a click to guide performers.
Post-Production Management:
Use gates, expanders, or volume automation to reduce bleed.
Apply multiband EQ to duck bleed-heavy frequencies.
Consider spectral repair tools (like iZotope RX) and check phase alignment.
Use Bleed Musically:
Some bleed can add cohesion and realism, especially in genres like jazz, lo-fi, or indie.
If it enhances the musical feel without hurting clarity, embrace it.